
$20/month or $120/year (Save 50%)
want to download this pattern?
Join the club to download every Hookfully pattern, including this one!
Get The Crochet Pattern
View free online
You can view an ad-supported, free version of this crochet pattern online, simply scroll down the page.
Purchase & download
You can purchase and download this ad-free pattern in our store.
$3.75

Sweet lemon baby doll onesie description
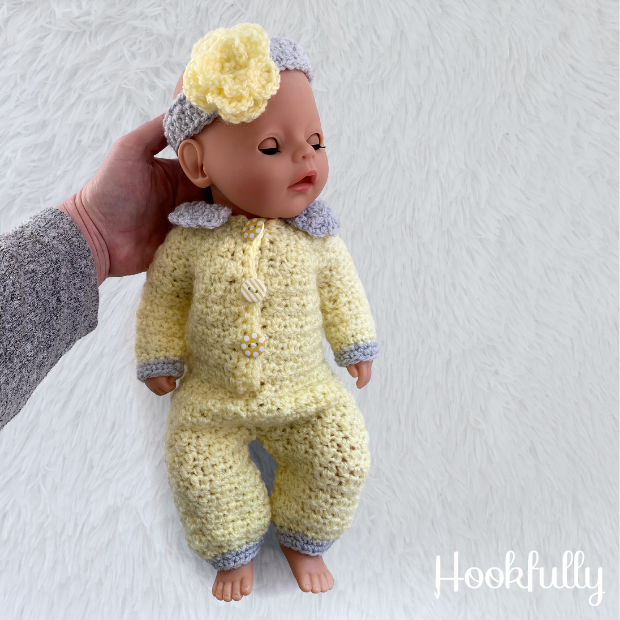
The sweet lemon baby dolls onesie crochet pattern is designed for 14 inch dolls and it even has a matching headband!
My youngest daughter is totally obsessed with baby dolls so I decided to treat her to a new outfit for spring. I found some lovely lemon yarn in my stash and instantly decided to keep up with the lemon theme by using the lemon peel stitch for this little dolls outfit.
My daughter absolutely loves it but stated “You must name it ‘Sweet lemon’ because lemons are sour, and this is definitely sweet!”
The Sweet lemon dolls onesie is designed to fit 14″-15″ baby dolls. As the name suggests, the baby dolls onesie is made using the lemon peel stitch giving it beautiful texture.
For those of you who haven’t tried the lemon peel stitch yet, don’t be put off as its super easy. It’s basically just alternating single and double crochet stitches.
The baby doll onesie buttons up the front and has an adorable lacey collar. The crochet pattern also includes a matching headband topped with a pretty flower.


How to crochet a baby dolls onesie
The sweet lemon baby dolls onesie crochet pattern is intermediate skill level. You will need to know all your basic crochet stitches to complete the pattern.
The onesie is made in one piece and the only sewing involved is to attach the flower to the headband and the buttons will need to be sewn onto the onesie.
To make the dolls onesie I used DK (weight 3) yarn. I used a 4mm crochet hook. Please check your gauge before starting and adjust your hook if you need to.
This will ensure that the clothes fit your doll. The crochet dolls clothes including the headband uses approximately 69g (201m/220yd) of yarn.

Why You’ll Love The Free Sweet Lemon Baby Dolls Onesie Crochet Pattern
- Low sew design!
- The onesie is made in one piece
- Intermediate skill level project
- Free crochet pattern with the option to upgrade
- Uses DK or light worsted, weight 3 yarn
- Perfect for 14″ baby dolls!

Crochet pattern information
Supplies
- 4mm crochet hook
- DK / light worsted / #3 yarn
- 14″ baby doll
- Sewing needle
- 15mm buttons x 3
Yarn
- Weight – DK / Light worsted / #3
- Brand – King Cole pricewise DK
- A – Lemon: 185 yards
- B – Grey: 35 yards
- Total – 220 yards
Size & Gauge
- Gauge: 2” x 2” gauge swatch = 10 rows of 9 sc
- Finished Size: H26cm x W14cm
- Fit: For 14″ baby dolls
Skill Level
Abbreviations
US Terminology (UK translation)
- ch – Chain
- dc – Double crochet
- FLO – Front loop only
- hdc – Half double crochet
- sc – Single crochet
- 2sc – 2 sc in 1 space (increase)
- sc2tog – Decrease (single crochet 2 together)
- sl st – Slip stitch
- st/sts – Stitch/Stitches
- tr – Treble crochet
Pattern notes
- Chains or finishing slip stitches are not included in stitch counts.
- Stitches separated with a comma are to be made in separate spaces. For example, (sc, 2hdc) would mean sc in first stitch then 2 hdc in the next stitch. eg. (sc x 2, 2hdc) would mean sc in first stitch, sc in second stitch, then 2 hdc in next stitch.
- Change colors while completing the last stitch on the previous row.
Important Information
By using Hookfully’s website you are agreeing to its terms & conditions, copyright agreement and safety disclaimer. Read more…
This post contains affiliate links. This means I may earn a commission should you choose to make a purchase using my links.
Baby doll romper – Free crochet pattern
VIP members can download the premium pattern from the top of this page to get more progress photos and zero ads. Not a member? Sign up here.
Doll headband
The headband is made to fit a head circumference of 27cm. For bigger heads add on 2 stitches for every cm.
Row 1
- Use yarn colour B (grey)
- ch x 51 then start in 2nd ch from hook
- (sc, dc) 25 times
- ch x 1 & turn
- 50 sts
Row 2
- (sc in dc, dc in sc) 25 times
- ch x 4 to reach back to row 1
- 50 sts
Row 3
- Turn to work into row 1 chains
- (dc in sc, sc in dc) 25 times
- Fasten off and sew both ends together
- 50 sts
Flower For Headband
Row 1
- Use colour A (lemon)
- ch x 25 then start in 2nd ch from hook
- sc x 24
- ch x 1 & turn
- (24 sts)
Row 2
- (sc, ch) 4 times in 1 st, sl st in next st
- Repeat the above step 2 more times
- (hdc, ch) 4 times in 1 st, sl st in next st
- Repeat the above step 2 more times
- (dc, ch) 4 times in 1 st, sl st in next st
- Repeat the above step 2 more times
- (tr, ch) 4 times in 1 st, sl st in next st
- Repeat the above step 2 more times
- Fasten off leaving a long tail for sewing
- Curl up the flower and sew into position
- Sew the flower to the join of the headband & weave in all ends
- (48 sts)
Body of Doll Onesie
Apart from increases sc should be made into dc and dc should be made into sc
Row 1
- Use yarn color A (lemon)
- ch x 31 then start in 2nd ch from hook
- sc+dc in 1 space,
- sc, dc, sc, dc (4 sts)
- Repeat the above steps 5 more times
- ch x 2 & turn
- (36 sts)
Row 2
- dc+sc in 1 stitch,
- dc, sc, dc, sc, dc (5 sts)
- Repeat the above steps 5 more times
- ch x 2 & turn
- (42 sts)
Row 3
- dc+sc in 1 stitch,
- dc, sc, dc, sc, dc, sc (6 sts)
- Repeat the above steps 5 more times
- ch x 1 & turn
- (48 sts)
Row 4
- sc+dc in 1 stitch,
- sc, dc, sc, dc, sc, dc, sc (7 sts)
- Repeat the above steps 5 more times
- ch x 1 & turn
- (54 sts)
Row 5
- sc+dc in 1 stitch,
- sc, dc, sc, dc, sc, dc, sc, dc (8 sts)
- Repeat the above steps 5 more times
- ch x 2 & turn
- (60 sts)
Row 6
- dc+sc in 1 stitch,
- dc, sc, dc, sc, dc, sc, dc, sc, dc (9 sts)
- Repeat the above steps 5 more times
- ch x 2 & turn
- (66 sts)
Row 7
- dc+sc in 1 stitch,
- dc, sc, dc, sc, dc, sc, dc, sc, dc, sc (10st)
- Repeat the above steps 5 more times
- ch x 2 & turn
- (72 sts) *Premium pattern has image here*
Row 8
The skipped stitches will be the arm holes
- (dc, sc) 5 times, dc in last st (11 sts)
- Skip 14 stitches
- (sc, dc) 11 times (22 sts)
- Skip 14 stitches
- (sc, dc) 5 times, sc in last st (11 sts)
- ch x 2 & turn
- (44 sts) *Premium pattern has image here*
Rows 9 – 16
- (dc in sc, sc in dc) 22 times
- ch x 2 & turn
- (8 rows of 44 sts)
Row 17
- (dc in sc, sc in dc) 22 times
- sl st to 1st st, ch x 1 & turn
- (44 sts) *Premium pattern has image here*
Rounds 18 – 29
- (dc in sc, sc in dc) 22 times
- sl st to 1st st, ch x 2 & turn
- (12 rounds of 44 sts) *Premium pattern has image here*
Onesie Legs
Round 1
- (dc in sc, sc in dc) 11 times
- skip 22 stitches
- sl st to 1st st, ch x 2 & turn
- (22 sts)
Round 2 – 10
- (dc in sc, sc in dc) 11 times
- sl st to 1st st, ch x 2 & turn
- (9 rounds of 22 sts)
Round 11
- (sc2tog, sc x 9) 2 times
- sl st to 1st st & ch x 1
- (20 sts)
Round 12
- Change to color B (grey)
- (sc2tog, sc x 3) 4 times
- sl st to 1st st & ch x 1
- (16 sts)
Round 13
- sc x 16
- sl st to 1st st & fasten off
- (16 sts)
Rounds 14 – 26
- Repeat rounds 1 – 13 for 2nd leg
- Weave in all ends and sew up gap at crotch
- (13 rounds) *Premium pattern has image here*
Sleeves
Round 1
- Use yarn color A (lemon)
- Attach yarn to dc under the arm & ch x 1
- (sc in dc, dc in sc) 7 times
- sl st to 1st st, ch x 1 & turn
- You will be left with a little gap under the arm which you can close up as you weave in the ends later on.
- (14 sts) *Premium pattern has image here*
Rounds 2 – 9
- (sc in dc, dc in sc) 7 times
- sl st to 1st st, ch x 1 & turn
- (8 rounds of 14 sts)
Round 10
- sc x 14
- sl st to 1st st & ch x 1
- (14 sts)
Round 11- 12
- Change to color B (grey)
- sc x 14
- sl st to 1st st & ch x 1
- Fasten off after round 12
- (2 rounds of 14 sts)
Rounds 13 – 24
- Repeat rounds 1 – 12 for 2nd sleeve
- Weave in all ends and sew up gaps under arms
- (12 rounds)
Edging & Buttons
Row 1
- Use yarn color A (lemon)
- Attach yarn to the left side of row 1 chs
- sc in the side of the ch
- sc x 16 (1 in the end of every row)
- ch x 1 & turn
- (17 sts)
Row 2
- sc x 4, ch x 2 & skip 1 for button hole
- Repeat above step 2 more times
- sc x 2
- Fasten off
- (14 sts)
Row 3
- Use yarn color A (lemon)
- Attach yarn to the right side of row 1 chs
- sc in the side of the chain
- sc x 16 (1 in the end of every row)
- ch 1 & turn
- (17 sts)
Row 4
- sc x 17
- Fasten off
- Sew 3 buttons onto the opposite side of the button holes (skipped stitches)
- Tuck the bottom of row 3&4 under row 1&2 and sew together
- Weave in ends
- (17 sts) *Premium pattern has image here*
Collar
Row 1
- Use yarn color B (grey)
- Attach yarn to the right side of row 1 chains
- sc x 30 in all chain spaces
- ch x 1 & turn
- (30 sts)
Row 2
- All FLO: 2sc, sc x 29
- ch x 1 & turn
- (31 sts)
Row 3
- sc, ch & skip 2
- (tr, ch) 4 times in 1 st, skip 2,
- Repeat the above steps 4 more times
- sc in last st
- ch x 1 & turn
- (26 sts)
Row 4
- sl st in 1st sc
- *(sc in ch sp, ch x 3) 4 times
- sc in next ch sp, sl st in next sc*
- Repeat between *’s 4 more times
- sc in next ch sp, sl st in last sc
- Fasten off & weave in ends to complete
- (26 sts) *Premium pattern has image here*
Published: November 25, 2022 | Last Updated: June 10, 2026
